


Microsoft Server 2003 and IIS 6.0
- Tutorial Overview
- Installation
- Generating a Certificate Request
- Submitting a Certificate Request
- Installing an Issued Certificate
- Securing Certificate Services
- Securing Server 2003
- Securing IIS 6.0
Tutorial Overview
This tutorial will guide you through the steps required to setup and secure both Microsoft Server 2003 R2 and IIS 6.0. In addition, to securing IIS you will be setting up SSL support for your web server. This tutorial is broken down into six sections. The first section is a brief overview of Server 2003, IIS 6.0, and the tools that will be used throughout this tutorial. The second section will cover to installation of the OS, IIS, and Certificate Services. The next section will cover the process to establish SSL on IIS, which focuses on the creation and management of certificates. The remaining three sections will cover the steps requires to secure Certificate Services, Server 2003, and IIS. These are the basic steps to secure each component. Depending on the configuration and intended use of each will determine the security measures required. This tutorial is used in Security in E-Commerce IS2771.
Server 2003 R2
Server R2 is an update of Windows Server 2003 that provides many additional features and benefits. The R2 release builds upon the increased security, reliability, and performance provided by Windows Server 2003. This will be the OS that IIS 6.0 is installed on.
IIS 6.0
Internet Information Services 6.0 is a powerful Web server that provides a highly reliable, manageable, and scalable Web application infrastructure for all versions of Windows Server 2003. Microsoft packaged the default installations of their web servers with an array of sample scripts, file handlers and minimal file-system permissions to provide administrators the necessary flexibility and ease of use. However, this approach tended to increase the available attack surface and was the basis of several attacks against IIS. As a result, IIS 6.0 is designed to be more secure out-of-the-box than its precursors.
Certificate Services
Certificate Services provides customizable services for issuing and managing certificates that are used in software security systems that employ public key technology. Certificate Services is available on computers running Microsoft® Windows Server™ 2003. This will be used to manage the certificate that you will generate to operate SSL on IIS.
MBSA
Microsoft Baseline Security Analyzer is an easy-to-use tool designed to assist you in improving your security management process by using and to detect common security misconfigurations and missing security updates on your computer systems. You can use MBSA to scan both your OS and installed components from Microsoft.
SCW
Security Configuration Wizard is an attack-surface reduction tool for the Windows Server 2003 with Service Pack 1 family of products. SCW guides you through the security policy creation process, which is based on the minimum functionality required for a server's role or roles.
Installation
Installing Server 2003
You can download server 2003 trial here. Before you can download the trail software you must create a Windows Live ID. You will have to verify ownership of the email address before Microsoft will send you other information. After you create your ID you will receive an informative email from Microsoft followed by a conformation email. The conformation email will contain the link to download the trail, the product code, and an installation instruction link.
You must download two ISO files and burn the ISO image to a disk You will need to CDs since the files are rather large. Label the disks 1 and 2 for you will need to know the difference during the installation process and for future reference.
After creating both disks and writing down the product code install server 2003 following regular OS installation procedures.
To complete the installation process you must install any drivers you machine will need. To get the full 180 days of use out of this trail you must register with Microsoft. This can be done over the Internet or phone. The Internet registration process is far less tedious for registering over the phone you will interact with an automated operator.
If you have any problems download or installing the OS you can reference the links that are included in the confirmation email for detailed instructions.
Installing IIS 6.0
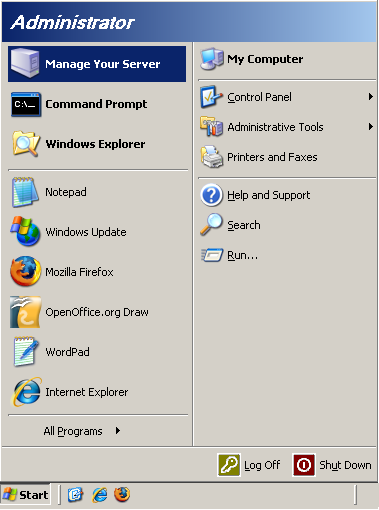
The installation of IIS will be done through the Manage Your Server (MYS) console. To open MYS click the Start button and select Manager Your Server.
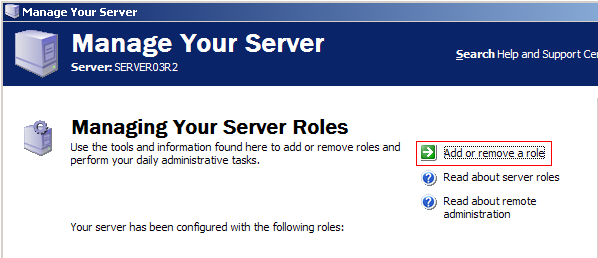
Once at the main MYS window click Add or Remove a Role.
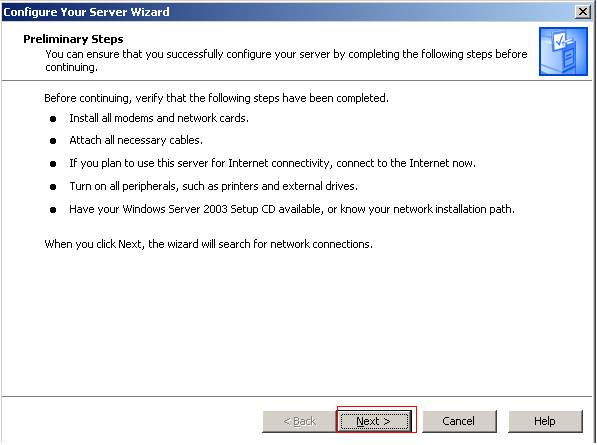
You will be prompted with a brief check list of items that must be completed or on hand to complete the installation of a role to your server. Click Next to continue.
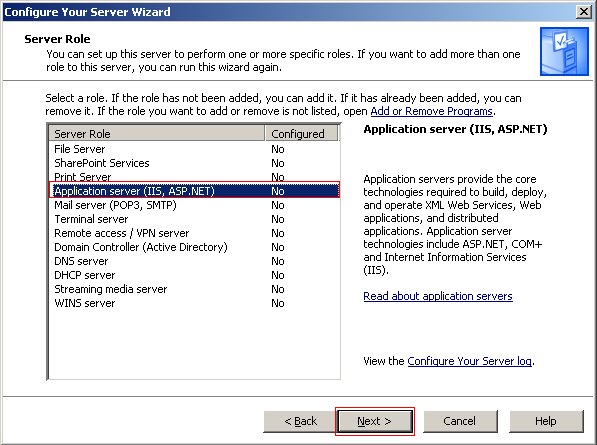
After the wizard scans your server to obtain its settings you will be allowed to select the role you wish to add. Select Application Server (IIS, ASP.NET) and click Next.
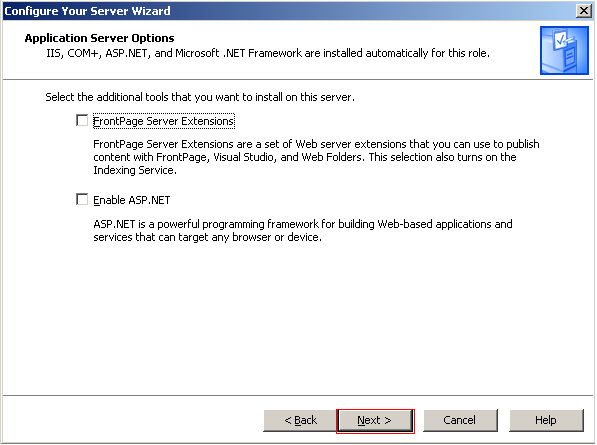
The next step is to install additional tools with IIS. This is done because by default IIS only installs tools that are required to service static content. You have the option to install Front Page Server Extensions and enable ASP.NET, which should not be done until it is determined that they are required. Not installing them at this time will ensure your server is that much more secure because it is one less component you have to secure. Click Next to continue.
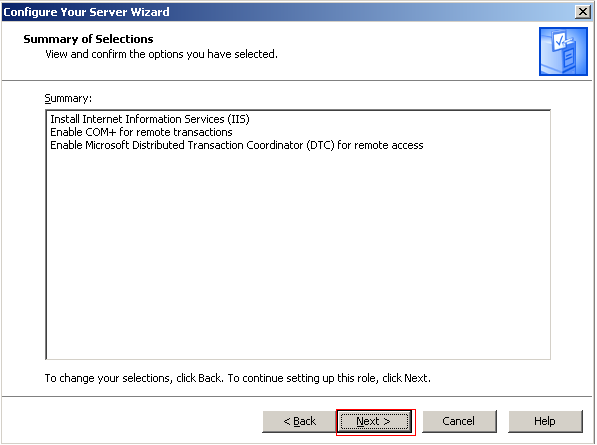
You will now be presented with a summary of IIS selections that will be installed. If you wish to change anything you can use the Back button. To complete the IIS installation process click Next.
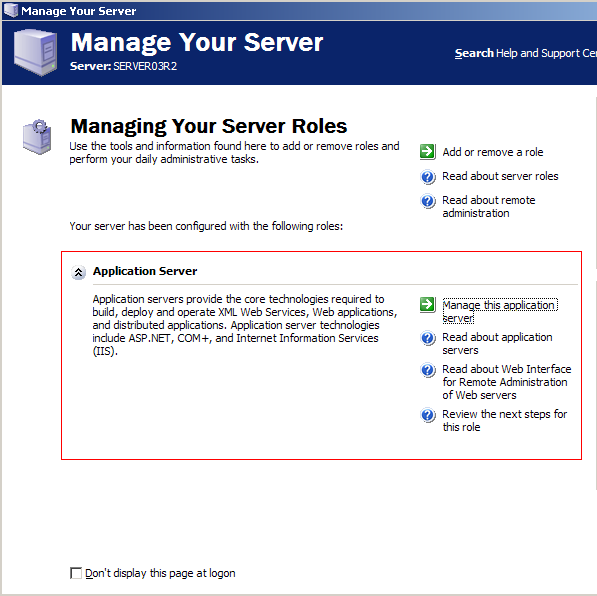
After IIS is installed you will be presented with a window stating that your server is now an application server and the installation wizard is complete. Click Finish to close the wizard.
Now you will see the Application role in the MYS window.
Installing Certificate Services
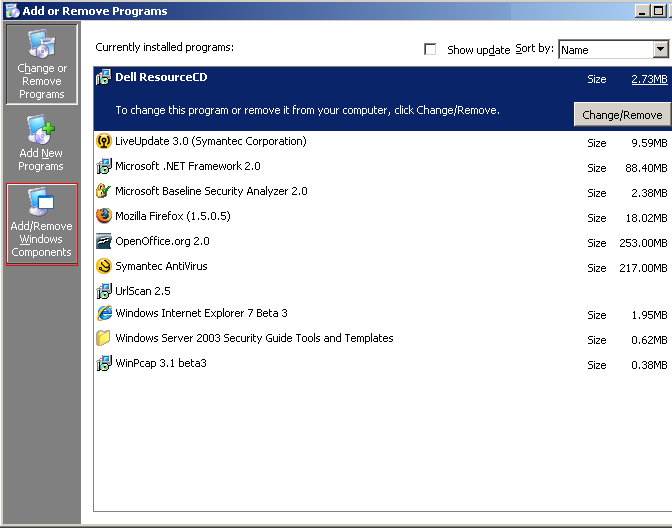
Since the certificate service is a separate windows component it has to be installed through the Add or Remove Programs option found in the Control Panel. Once you open the Add or Remove Programs window click on the Add/Remove Windows Components on the left hand side of the window. This will open the Windows Component Wizard.
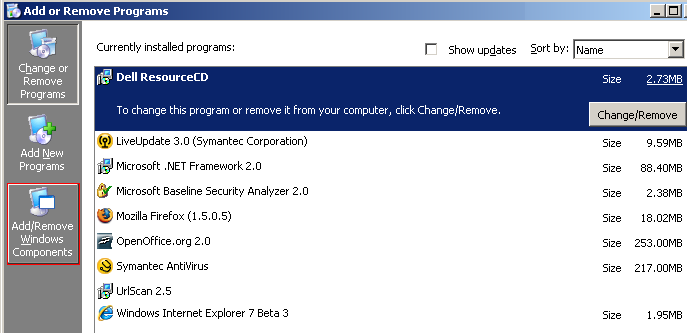
Once in the Windows Component Wizard click on Certificate Services component.
A warning dialog box will appear to inform you that once Certificate Services is installed you will not be able to change the machine's name or domain membership. Click Yes to acknowledge this and continue with the installation process.

Click the Details button to view the Certificate Services subcomponents and ensure that both components are selected to install.
When you are finished click OK to return to the Windows Component Wizard.
Once back at the Windows Component Wizard click Next to continue the installation process. This will bring to the configuration of the Certificate Service. You will now select the type of Certificate Authority you want to set up. Select Stand-alone root CA and click Next.
Next, you will be prompted for information to identify the CA. Enter the Common Name for this CA and Distinguished name Suffix. For the common name you can use your server's name, in the example it is server03r2, and for he Distinguished name suffix use certsrv. Click Next to continue.
Now you will select the locations for the certificate database, database log, and shard folder. The defaults for the database and log is %windir%/system32/Certlog. The default location for the shared folder is %server name%/CertConfig. Keep these settings and click Next to continue.
A warning dialog box will appear to inform you that to complete the installation of the Certificate Services IIS must be temporarily stopped. Click Yes to stop the service and install the Certificate Services. Another warning box will appear to inform you that Active Server Pages (ASP) must be enabled in IIS in order to allow Certificate Services to provide web enrollment services. Click Yes to enable and complete the installation.
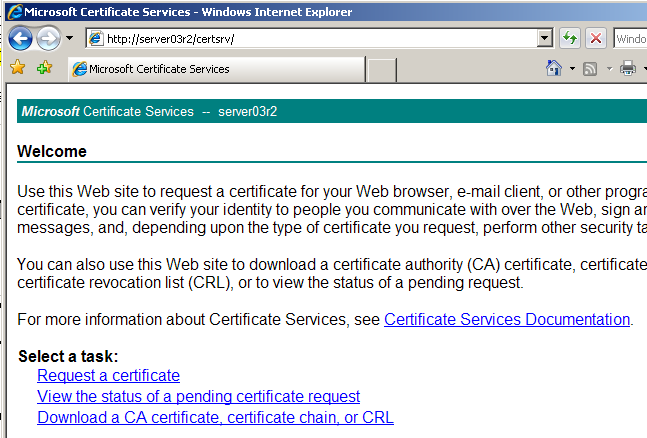
To access the Web Enrollment Support component in a browser type http://server03r2/certsrv/.
Generating a Certificate Request
The first step in configuring IIS to use SSL is to generate a certificate request. This request is for a SSL certificate that will be created by a CA, which in this case will be the Certificate Services an internal CA.
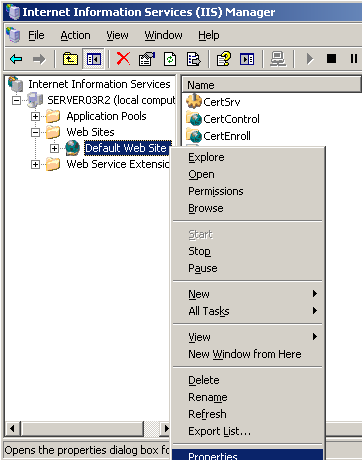
Open the IIS Manager by clicking the Start menu and selecting Administrative Tools and IIS Manager. Once opened navigate to the Default Web Site, right click it and click Properties.
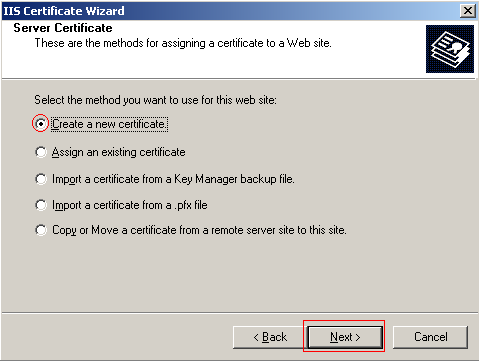
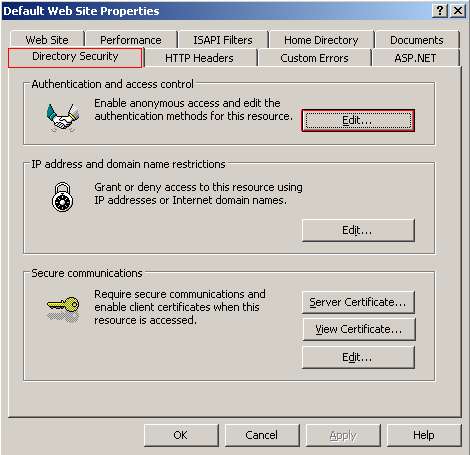
Click on the Directory Security tab and select Server Certificate, which will start the IIS Certificate Wizard. You will be presented with a welcome screen where you must click Next to continue.
The Web Server Certificate Wizard can generate a new certificate request or manage existing certificates. To Create a new certificate choose Create a New Certificate and click Next.
Next you must choose to either create a request and submit it manually to a CA or submit the request automatically to an online CA. The option to submit a request automatically is only available if you have Active Directory Integrated Enterprise Root CA. Since this option is not available the former is already selected. Click Next to continue.
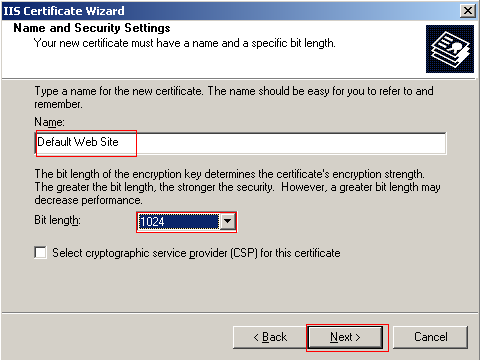
The next screens will prompt you for information required to create the certificate. First enter Default Web Site for the Name of the certificate. This name should correspond with the name of your site. You can also change the bit length, which will be used for the public key encryption. For this example you can leave it at 1024. Click Next to continue.
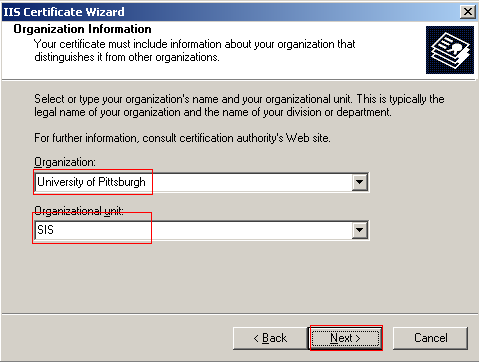
Next you must enter the name of the organization and the organizational unit the certificate is associated with. You can create your own names here. Click Next to continue.
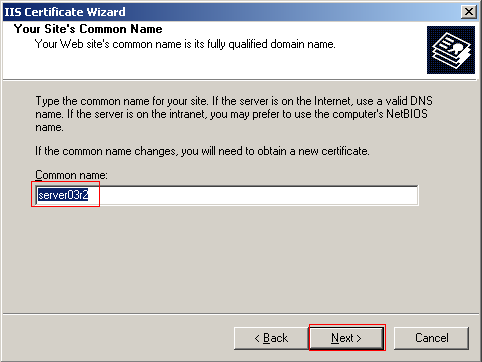
You must now enter the server's common name. The name should be the same as what users will enter in their browsers to access your site. If this is a public site you should use a valid DNS name. However, if the server is on the intranet you may use the computer's NetBIOS name. You can use your computers name. Click Next to continue.
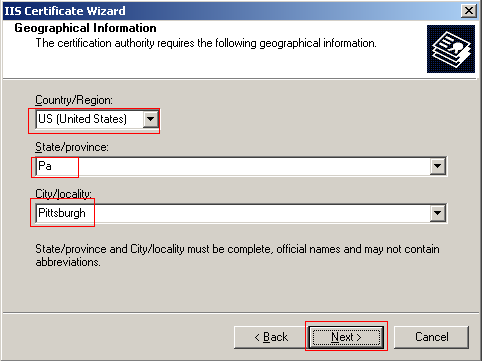
The next step requires you to enter geographical information. Enter your Country, State, and City. When you are finished click Next.
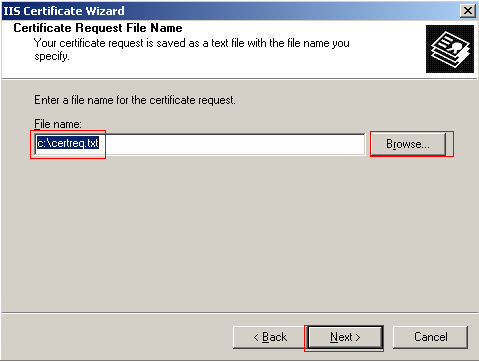
Select the location you wish to store the certificate request. This is important to remember for this file will be submitted to a CA as the request for the SSL certificate. Choose the location where you want to store this file and click Next.
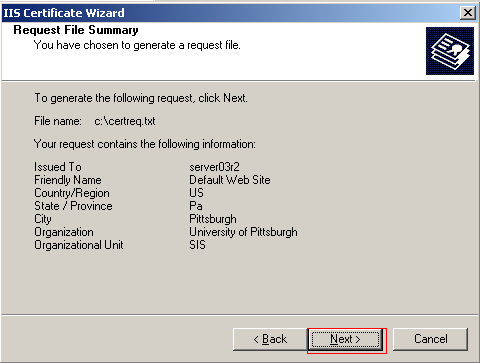
You will be presented with the summary of the file, which contains all the information you provided. If this information is correct click Next to generate the file, completing the wizard. If not you have the option to go back and correct any mistake.
Submitting a Certificate Request
The certificate request you previously created now must be submitted to a CA. You will be submitting the request to the Microsoft Certificate Services server you installed.
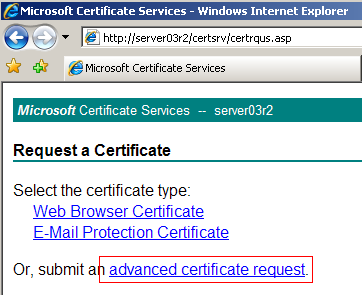
Open a browser and enter the address of your CA. This is http://server03r2/certsrv/ (remember to replace server03r2 with the name you used). Once there, select Request Certificate.

Then choose Submit an Advanced Certificate Request.
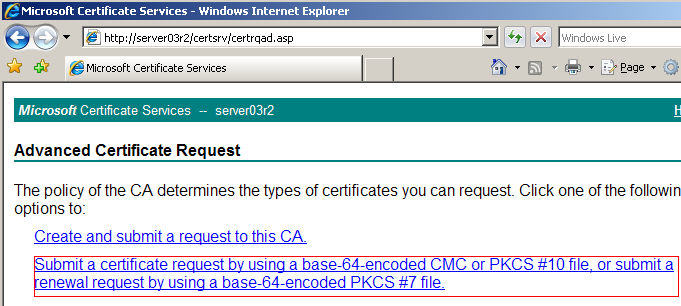
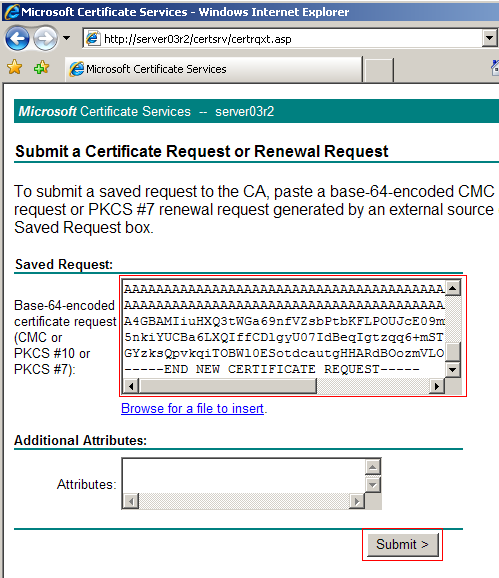
On the Advanced Certificate Request page select Submit a Certificate Request by Using a Base-64-encoded CMC or PKCS #10 file.
Now you have to open the certificate request file you saved to your hard drive from the previous step using Notepad and paste the entire contents into the textbox. By default browse for a file option will not work if you browsing from a Windows Server 2003 machine due to default IE security restrictions. However, it will work if you using a different OS. After you have pasted the contents of the certificate request file into the textbox click Submit to submit your request for a SSL certificate.
Your request will be submitted to the Certificate Services server you installed earlier.
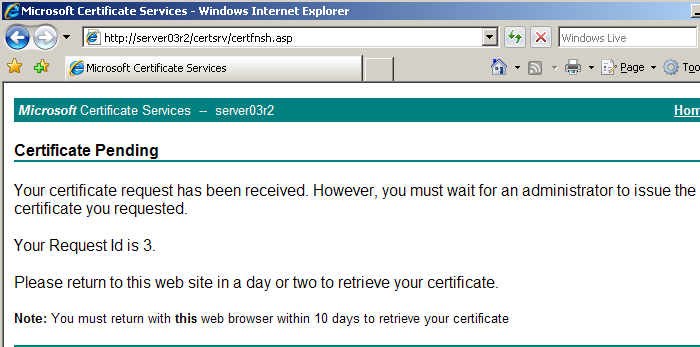
After you have submitted your request you will be presented with a confirmation screen, which will have your request ID and instructions on retrieving your SSL certificate. This information is critical when retrieving your SSL certificate upon it being granted depending on the number of requests the server handles.
Installing an Issued Certificate
Once you have been issued a certificate you can download and install it on your Web server. This will then be issued to each visitor that connects to your site using https.
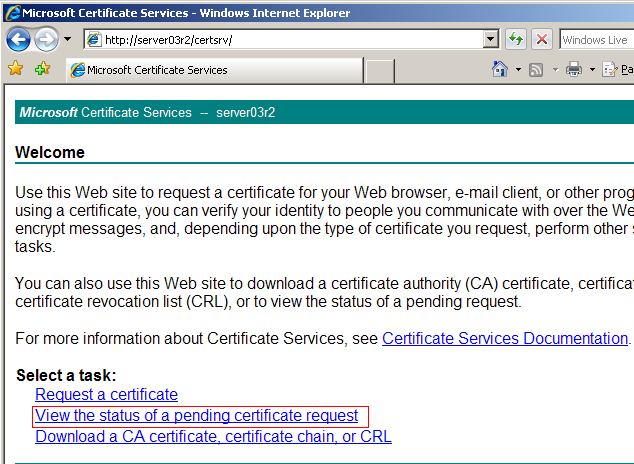
Browse to the address of your CA, http://%server name%/certsrv and select View the Status of a Pending Certificate Request.
There may be multiple certificate requests pending. If this is the case you will see multiple requests and must select your request, which is where having your conformation information is helpful. Select your request to continue.
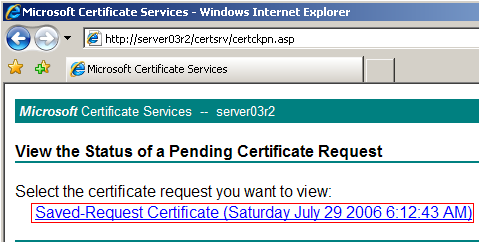
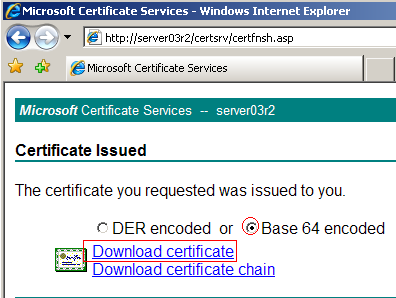
You can download the certificate using either of the encoding methods and save the file to your hard drive. For the tutorial the Base-64 encoded option was used. Select Download Certificate to begin the download.
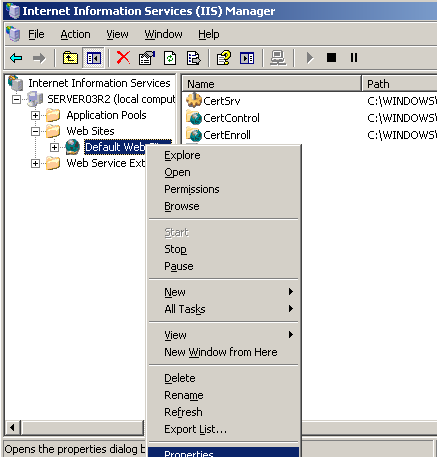
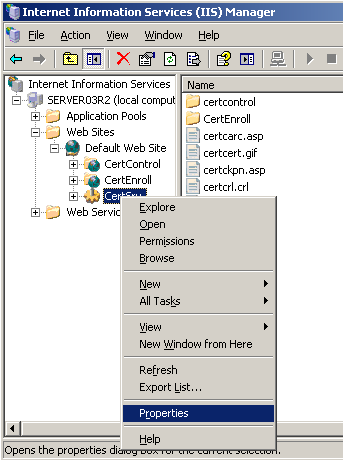
After downloading the SSL certificate go back to the IIS Manager. If you closed it you can open it by click on the Start menu and going to Administrative Tools and selecting Internet Information Services Manager. Once opened right click the Default Web Site and select Properties.
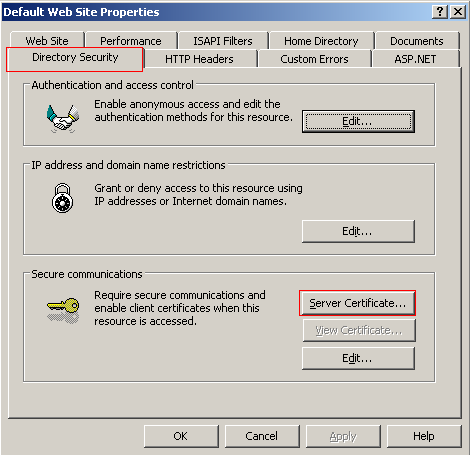
Select the Directory Security tab and click the Server Certificate button to start the Web Server Certificate Wizard.
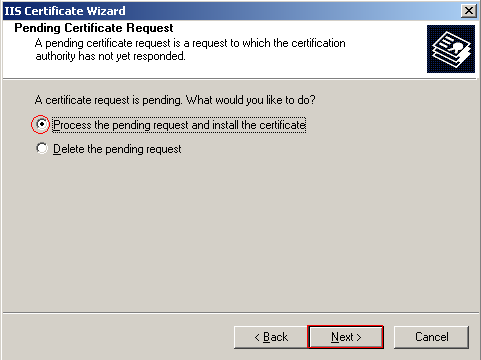
Click Next on the initial Welcome screen and select Process the Pending Request and Install the Certificate. Click Next to continue.
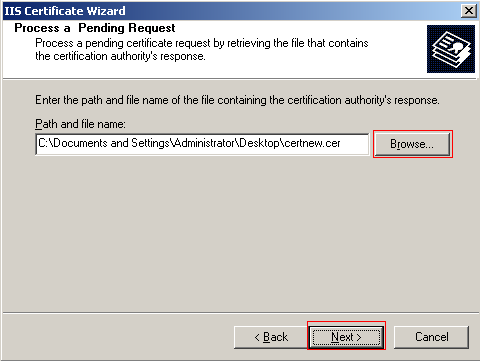
You now need to provide the certificate wizard with the SSL certificate you downloaded. Browse to the location of the SSL certificate you save to your hard drive and select it. Click Next to continue.
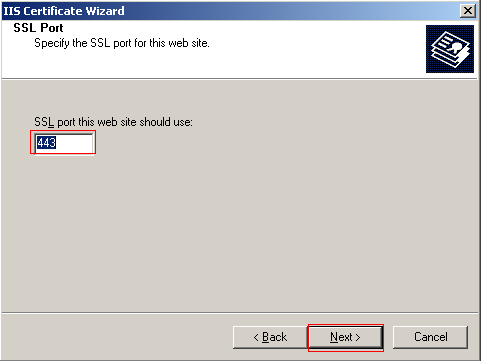
Enter the SSL port that the website will use. By default the port is 443, which you you can use and click Next to continue.
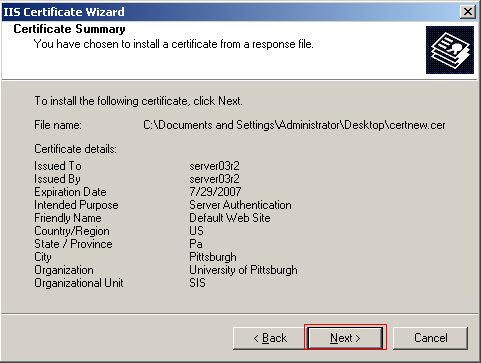
You will now be presented with a screen summarizing your choices, which you must confirm before the installation of the certificate can being. If any changes need to be made you can use the Back button otherwise click Next to install the SSL certificate.
To verify that your SSL certificate is installed correctly open a web browser and navigate to https://<your server name>/. Since the certificate you installed was signed by an unknown CA you will be presented with a warning where you can choose a number of certificate options. The default selection is to accept the certificate for this session only, which is fine. Click OK to accept the certificate and you should see the Default Web Site's home page. If you obtained your certificate through a trusted CA this warning message would not appear.
Securing Certificate Services
After installing the Certificate Services Web Enrollment Support a virtual directory named CertSrv is created under the default website. This virtual directory will be the entry point for the web enrollment component and must be secured. Using virtual directories you are able to publish multiple web sites using one server and IP address. This creates another entry point that must be secured.
General Permissions
There should only be a select number of general permissions enabled to ensure users have limited access to certsrv but can still complete their tasks.
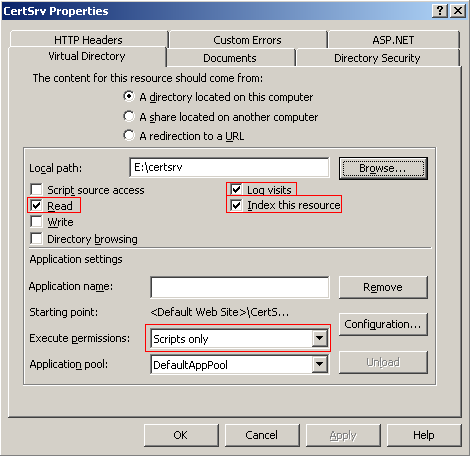
Open the IIS Manager and navigate to the Default Web Site, which is where you will find the CertSrv virtual directory Right click CertSrv and select Properties.
Select the Virtual Directory tab if it is not already selected. Check that only the read, log visits, and index this resource are the only general permissions selected under the Local Path section. Then check that Scripts only is selected for Execute Permissions under the Application Settings and click Apply.
Configuring SSL Options
You have the ability to require SSL for every site your web server is hosting or just for particular sites. This will ensure that all information transmitted while using the certificate services web enrollment is encrypted. To configure your certificate services to only use SSL open the CertSrv Properties through the IIS Manager and open CertSrv properties if it is not open.
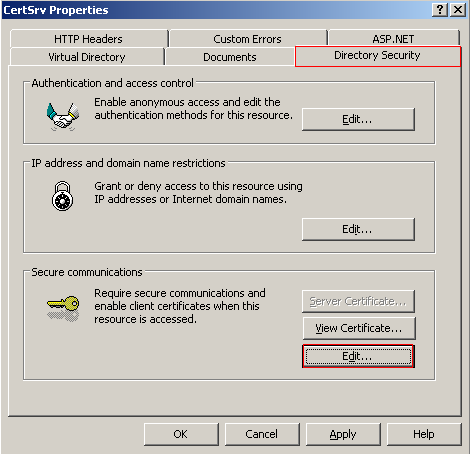
Select the Directory Security tab and click the Edit button under the Secure Communications section.
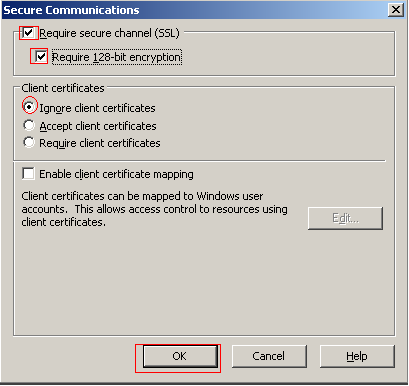
Select Require Secure Channel (SSL). You can also require 128 bit encryption, however, older browsers, and browsers distributed in countries where US export restrictions still apply, may not support 128 bit encryption and will not be able to connect. If this option is not selected older browsers will fall back to lower levels of encryption, which are no longer deemed secure. Check that Ignore Client Certificates is selected and click OK to apply the changes.
Configuring Basic Authentication
By default anonymous authentication is configured for web enrollment. It is recommended that you disable anonymous authentication and configure another authentication mode, which will prevent any user from submitting a request. This will help you avoid unneeded administrative tasks dealing with certificates. It is best to use the methods that will encrypt the users credentials, which are Integrated Windows, Digest, and .Net Passport.
To setup the Certificate Services web enrollment to use Basic Authentication, where information is sent in plain text open the properties for CertSrv. Selection the Directory Security tab where you will click the Edit button under Authentication and Access Control.

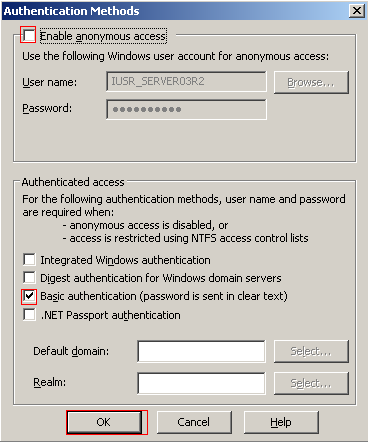
Disable Anonymous Access and Select Basic Authentication. IIS will provide a warning stating the vulnerability of clear text passwords and you must click Yes to continue. You can leave the Default Domain and Realm blank IIS will use the name of the local machine. The default Domain specifies the domain against which the user's credentials will be checked if the user does not supply a domain name when prompted. Click OK to apply the changes.
Moving CertSrv
The default installation directory for CertSrv is C:/%WINDOWS%/system32/certsrv, which should be moved to another partition or hard drive in order to restrict access to sensitive data. Copy the certsrv directory and past it into a different partition or hard drive. Then open the properties window for CertSrv through the IIS Manager. Select the Virtual Directory tab and change the local path to the new partition or hard drive to where you moved CertSrv. Click Apply to apply the setting chagnes.

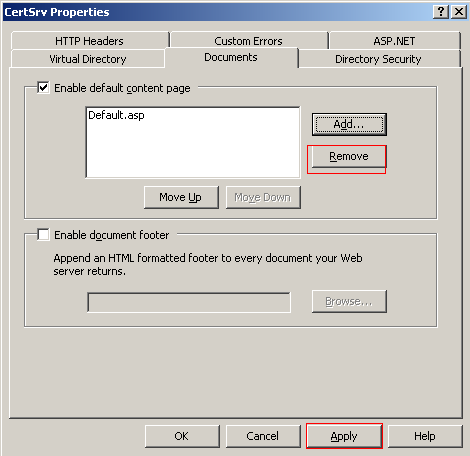
Change Document Types
There will be a number of default document types that CertSrv is set up to look for when a user makes an initial connection. Changing this will ensure that only the correct page is found when a user connects. The only document that is required is Default.asp, the rest can be removed.
In the properties window select the Documents tab and remove all content except Default.asp. Click Apply to apply the setting and OK to close the properties window.
Securing Server 2003
After you have installed the OS you should run Windows update, which will look for updates that have been released since the software's release http://update.microsoft.com/windowsupdate/v6/default.aspx?ln=en-us.
If you have installed any Office software you need to check for updates at http://office.microsoft.com/en-us/officeupdate/default.aspx.
Microsoft Baseline Security Analyzer (MBSA)
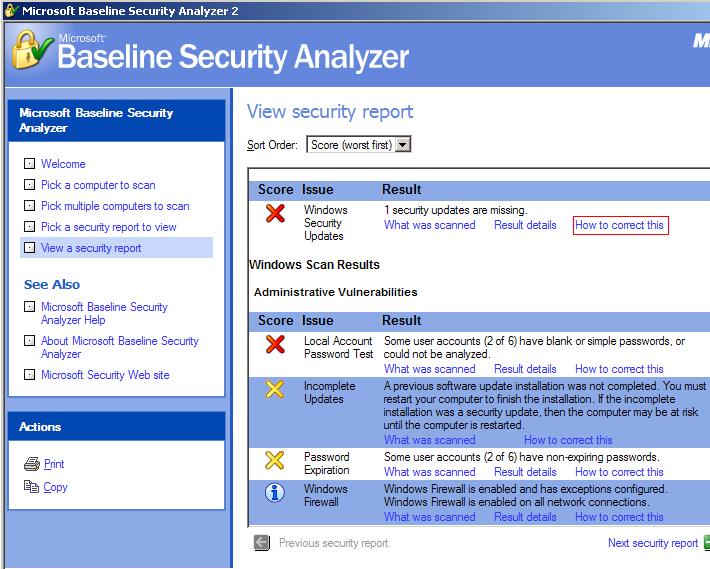
Microsoft has released a security analyzer tool that will scan your computer and determine your security state in accordance with Microsoft's security recommendations and offers specific remediation guidance. You can download the tool here http://www.microsoft.com/technet/security/tools/mbsahome.mspx.
Run MBSA and correct any of the high and medium risk items. All items with red or yellow Xs must be corrected. Red indicates a missing security update while yellow indicates missing update rollups or service packs.
You can click the How to Correct This link to obtain more information on what has to be done to solve this issue.
Security Configuration Wizard (SCW)
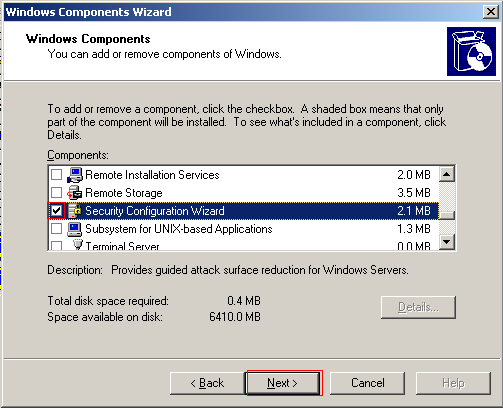
With this tool, you can quickly and easily disable unnecessary services, remove unwanted IIS virtual folders, block unused ports configure audit settings and lock down access to critical system files. The only condition is that the server running SCW must be Windows 2003 SP1. Install SCW by going to the Control Panel and selecting add/remove programs. Then within Add or Remove Programs select Add/Remove Window Components.
Scroll down until you see the security configuration wizard and select it. Click Next to install it. You will need your windows server 2003 R disc two to complete the installation.
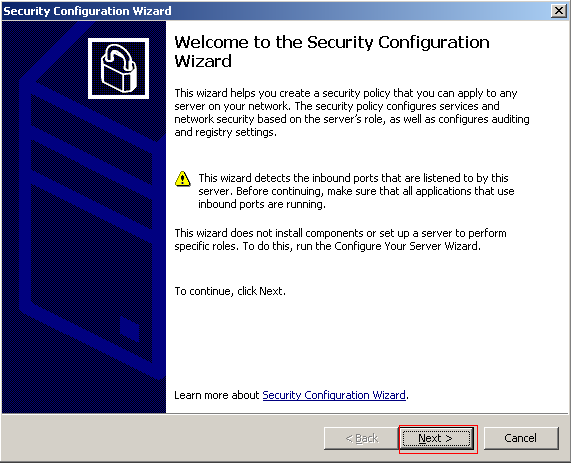
You can access the SCW by going to the Administrative Tools menu found in the Start Menu. Upon start up you should note the message that is highlighted with the yellow yield sign. The message indicates that the wizard will detect inbound ports that are being used by this server. This requires that all applications that use inbound ports be running before you run the Wizard and create the security policy. Click Next to continue.
Select Create a New Security Policy and click Next to continue.

Next, you must select the server that the wizard will use to create the security policy. This is an important step because the wizard will use the server's configurations to create the security policy. By default, the wizard will enter the server you are running the tool one. If this is correct click Next to continue if not change the server name to continue.
The remaining portion of this wizard will be specific to each server. The wizard will scan the server’s current settings and configurations to be used as default selections when creating the security policy. These selections can be changed during the questioning.
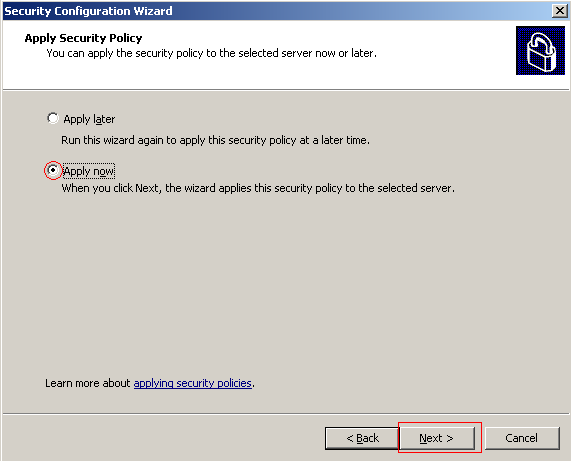
The questions will cover role based services, network security, registry setting, audit policy, and IIS. After completing the wizard, you will be prompted to save the security policy and have the option to install the policy now or later. Select to Apply the Policy Now.
Edit Groups
The Everyone group should be removed from Local Users and Groups. This account acts as a catch all for all users and should be removed to prevent potential attackers from taking advantage of its permissions.
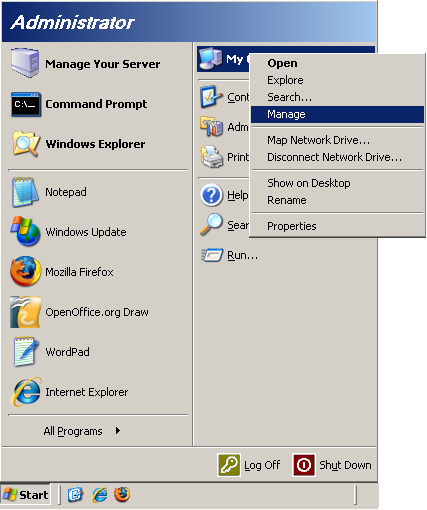
This can be done through the Computer Management window, which can be accessed by clicking the Start Menu and right clicking My Computer and selecting Manage.
Edit Local Users and Groups
There are a number of default Users and Groups that are installed, which can be helpful for an attacker. This accounts need to be removed or disabled. As you install products on your server there is the possibility of that piece of software creating another User. This account will be a vendor account, which can also be used to compromise your server. It should be determined at that time if the account should remain active.
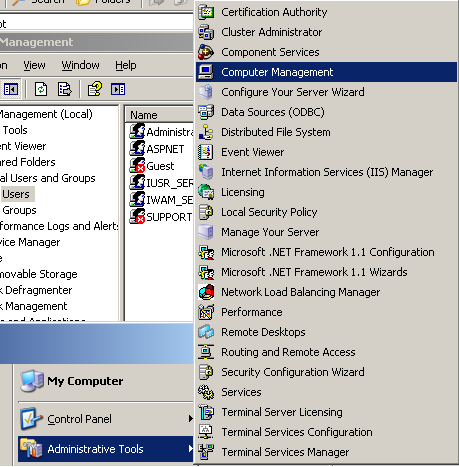
To access the Local Users and Groups click the Start Menu and go to Administrative Tools. There you will find Computer Management that will allow you to edit settings on your computer.
In the Computer Management expand Local Users and Groups, which is under System Tools.

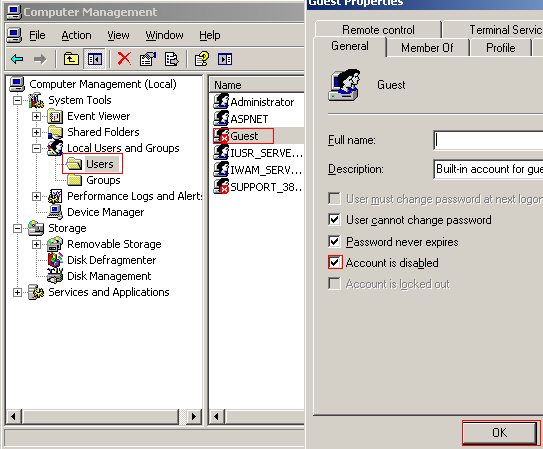
Click on the Users folder and disable the Guest account and any other account you do not wish to use. This can be done by right clicking the Guest account and selecting Properties. Select the General tab under the properties window and select Account is Disabled. Click OK to continue.
Then click on the Groups folder and remove the Everyone group and any other groups that are not required. The Guests group is required because it is used for to IIS the ability to allow anonymous access. The account can be deleted by right clicking it and selecting Delete. This is a permanent action. You will receive a warning message stating that even if you recreated the group you will not restore access to resources. Click Yes to delete the group.

NTFS
All secure files should be grouped together in a directory and strict security permissions should be applied. To do this right click the folder you wish to edit the NTFS permissions and select Properties. Select the Security tab and remove or add groups or users.
Securing IIS 6.0
After you have installed IIS it is good practice to run MBSA again. This in addition to scanning your OS it will also scan all of Microsoft's products. Run MBSA and correct any of the high and medium risk items. You can click the How to Correct This link to obtain more information on what has to be done to solve this issue.
Disabling the Default Web Site
The default web site includes some important files that you might need to use at a later date. For example when you installed certificate services web enrollment a virtual directory was created under the default web site called CertSrv. This makes the default web site an important item to secure.
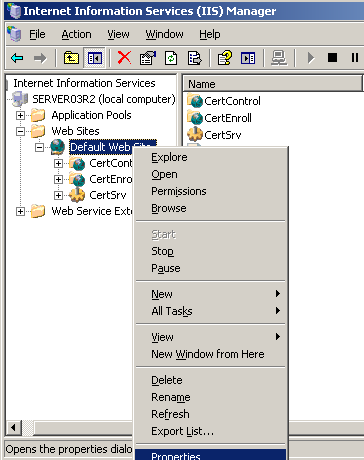
To disable the default web site open its properties window, which can be accessed by going to the Start Menu then selecting the Administrative Tools where you will find the IIS Manager. Navigate to the default web site, right click it and select Properties.
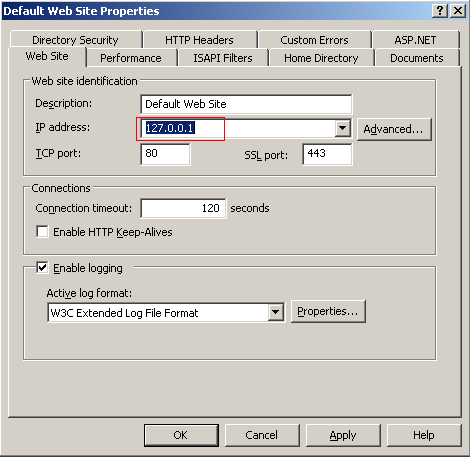
In the Web Site tab change the IP address to 127.0.0.1, which is the loopback address. Messages will not be delivered to the network but returned to the calling application.
Relocate Content Files
By default IIS creates the default web root path on your system drive during installation at C:\Inetput\wwwroot. This and any other content files should be moved to another partition or hard drive in order to restrict access to sensitive information located on the system drive. To relocate web content, first copy your web files to a new hard drive or partition.
Relocation the root path to another partition or hard drive will restrict access to sensitive system information if there is a security breach. It is possible to request a file outside the folder structure of an IIS server, which is why relocating the root path to another hard drive is recommended. When this is done the local path needs to be changed so IIS will point to the new home and define the default document that indicates the home page that will be displayed.
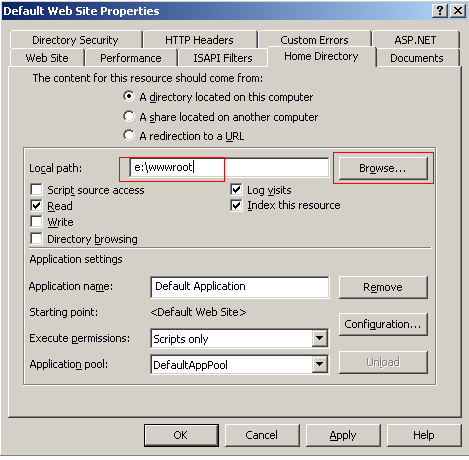
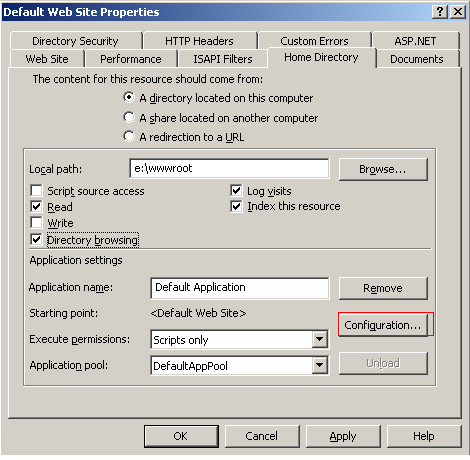
In the default web site properties window select the Home Directory tab and change the local path by selecting Browse and navigating to the new location.
After you have moved the content to another hard drive or partition you should configure the security settings using NTSF.
Web Service Extensions
Since IIS by default is configured to serve only static content you have to enable the appropriate web extension if you want to serve dynamic content.
To enable web service extensions open the IIS Manager and select the Web Service Extensions folder.
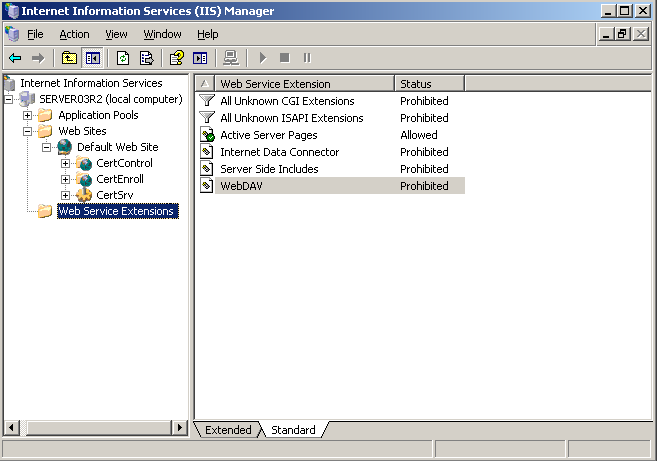
You should only have one extension enabled, which is the ASP, used by certificate services web enrollment. If any other extension is enabled you can disable it now. Remember to help reduce malicious attacks you should only enable required web service extensions.
Application Mappings
There are many programming and scripting languages that you can use to develop Web applications. Thus, IIS uses the file name extension of a requested resource on your Web site to determine which Internet Server API (ISAPI) or Common Gateway Interface (CGI) program to run to process a request. IIS 6.0 is preconfigured to support common application mappings. It is best to remove those that are not used.
Open the default web site properties window and select the Home Directory tab. Inside the tab under Application Settings click the Configuration button.
Remove all but the following extensions under the Mappings tab
- .asa – Active Serve Application, which is Microsoft's specification for dynamic web pages created using Visual Basic or Jscript. This extension cannot be browsed it is prohibited by ASP for security reasons. .asp – Active Server Pages, which is ASP code embedded in a HTML page for the creation of dynamic content using Visual Basic or Jscript.
- .cer – Certificate file and is used when certificate services are installed.
- .cdx – Active Channel Definition File, which is an XML file used with Microsoft's Active Channel technology, which contain the URLs to the pages and subpages that make up the channel's offerings.
- .htm and .html – Standard Hyper Text Markup Language pages
- .stm, .shtm, and .shtml – Server Side Includes embedded in HTML pages
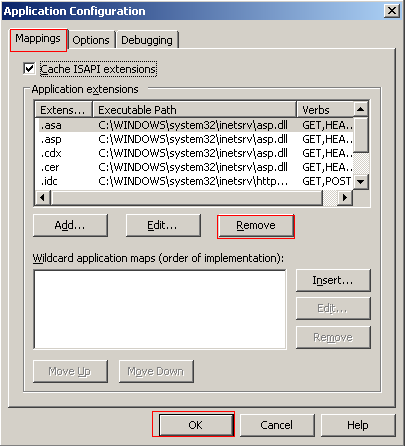
You can add more application extension mappings when required.
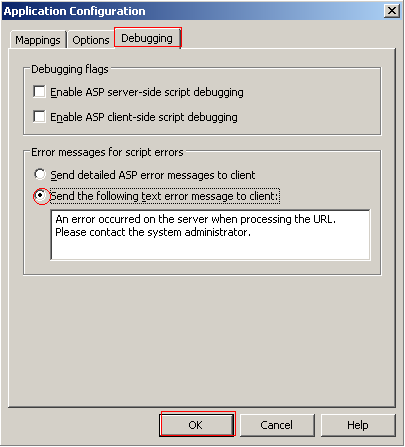
Application Debugging
Changing the error message a client receives can prevent the disclosure of critical information that would be useful to attackers. You can create both basic and custom ASP error messages that will producer a nicer user experience in addition to the secure benefits.
To create a basic ASP error message select the Debugging tab under the Application Configuration window. Check that the debugging options are unchecked and change the error notification to “send text error message to client.” This will prevent detailed error messages being sent to potential attackers, which can be used to compromise your server.
Anonymous Authentication
Anonymous authentication gives users access to the public areas of your Web or FTP site without prompting them for a user name or password. By default, the IUSR_computername account is used to allow anonymous access.
To change the authentication method select the web site you wish to change, use the default web site, and open the properties window. Select the Directory Security tab and click the Edit button under Authentication and Access Control.
Leave anonymous access enabled if you wish to allow anybody the ability to access your web site. If you wish you can disable anonymous access and require an authentication method you would do that here.
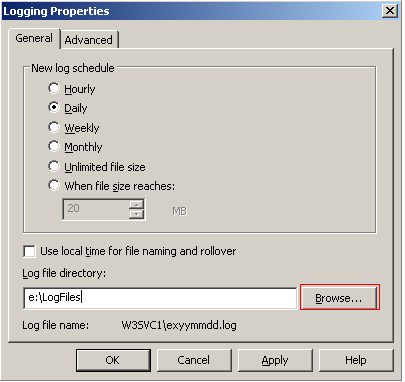
Log Files
You need to have a logging system to monitor clients use of your web site for malicious activity. However, if you leave your log files where an attacker can access them they can erase any traces of their presence. This is why you should more log files to a separate hard drive or partition and implement file security.
Open the properties window of the default web site and select the Web Site tab. Then check that Enable logging is selected and the Active Log Format is W3C and click Apply.
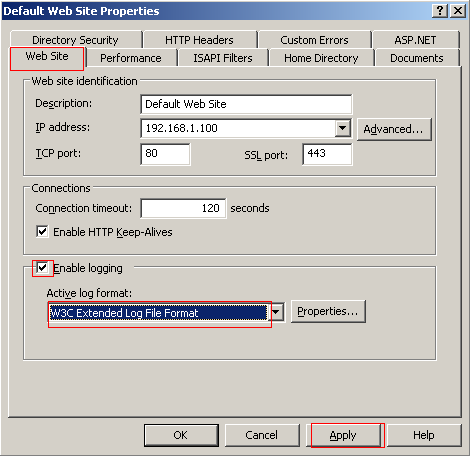
Now to move the log to a difference location click the Properties tab in the Logging section. And move the Log File Directory. You will have to create the directory that you change the log to.