


Forensics
- Tutorial Overview
- Port Redirection
- Hidden Data in Files
- Steganography
- Viewing Internet Explorer Cache
- Installation Instructions
Tutorial Overview
The objective of this tutorial is twofold. The first is to introduce you to some of the tools and techniques used for forensic analysis. The second is to demonstrate some of the mechanisms used by malicious attackers as well as forensic experts to disrupt computer networks and manipulate information access.
This tutorial session will cover data storage and access, bypassing filtered [blocked] ports, reviewing Internet activity, and the use of steganography. Open-source forensic tools will be introduced and demonstrated for each exercise. The tutorial has been setup for all of the exercises and the required executables are accessible through linked short-cuts on the desktop of the administrator (no password needed to logon). The desktop is shown below:
If you would like to do the exercise in your own computer the installation instructions are given in the Appendix. If you need further assistance, contact the GSA.
Required Equipment/Software
Most of the tools used for this lab exercise is freely available for non-commercial testing purposes and opensource software, either freeware or shareware.
Port Redirection
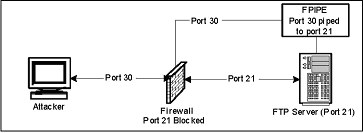
The purpose of this lab is to demonstrate how an attacker could exploit a machine and obtain access to a server with a filtered port by piping another unfiltered port. Because of sophisticated Trojans, it could be hard for a virus detection program to detect the problem. Because of that, a port scanner/listener must be used to determine if/what ports are actively carrying traffic.
Scenario
Imagine that an IT department has an FTP server on an IBM server that they use to share source code between other departments within the organization in various locations throughout the US on the same LAN/WAN. By default, the information security department blocks certain known ports from being exposed to the internet through a firewall. Some of these ports include the well known 21, 23, 80, 8080, etc.
A user logs onto this IBM server with Windows 2000 through Windows Remote Desktop Connection and accidentally downloads a Trojan that is meant to get access to and FTP server. However, if port 21 is blocked through the Firewall, how could the attacker connect to the FTP server? There is a very simple technique known as port redirection. Port redirection is a sophisticated way of bypassing port filtering, firewalls, and IPSEC.
Exercise
- Login to a Windows machine in the lab.
- Username: Administrator
- Password: (no password)
- Get the FTP server running
- Double Click the link "Start FTP Server" to open the FTP Server configuration tool.
- Click the START button on the top left of the FTP Server configuration panel.
- Confirm that the FTP server is running on port 21.
- Double Click the link "View Ports" to run a windows terminal showing the various ports being used.
- Which port is the FTP Server running on?
- Do not close the terminal. This terminal will be referred to later as "FPORT terminal."
- Redirect the network traffic on port 21 to port 30 (or any arbitrary port number).
- Double Click on the link "Redirect FTP port to 30" to open a windows terminal.
- Enter command: ipconfig
- What is the IP address of the computer?
- Enter command: fpipe –l 30 –s 30 –r 21 –v <ip-address>
- Do not close the terminal. This terminal will be referred to later as "FPIPE terminal." f.
- Check the FPORT terminal by entering command: fport
- What port is the executable "fpipe" running on?
- Start a ftp-client session and connect to the server (Assume that port 21 is blocked)
- Click on Start in the Windows machine and then Run. Type cmd and Enter key. Now you have a new Windows terminal.
- At the prompt enter command: ftp
- If you are connected, check the FPIPE terminal. What is the response.
- Enter command: open
- At the "to" prompt, type: <ip-address>30
- At the "username" prompt, enter: anonymous
- At the "password" prompt, enter: (no password, just press Enter)
- Type command: dir
- Check the FPIPE terminal. What is the response?
- What sort of security problems can occur due to port redirection?
- Can port redirection be used for any useful purpose?
- Close all open windows.
Hidden Data in Files
The purpose of this lab is to demonstrate the use of a hex editor and hash tool in computer forensics. This lab will also demonstrate how data can be modified within a file or hidden on a disk without the data being saved as a file. The lab will be using a hash value to find initial evidence of tampering within a file. A hex editor will be used to compare the two files to find the exact differences. Also, the hex editor should demonstrate that hidden data can be stored onto the storage device without actually saving as a file in the operating system.
The idea is that there is lots of slack space (shown as dots using the hex editor tool) on the storage device that runs to the end of the sector that the file is saved in. This is the space on a disk that is unused when a file smaller than a sector is saved into that sector. This slack space can only be used if the file saved in that sector is made large enough to take up all of the space in the sector. A hex editor can be used to directly store data directly onto this slack space, as will be demonstrated in this exercise. The MD5 hashing tool uses an algorithm to derive a hash value for any given file. Each file has a unique hash value. Therefore slight changes to a file can generate totally different hash values.
Exercise
NOTE: Hex-editors and other editors that can write directly to a storage device must be used with extreme caution.
- Login to a Windows machine in the lab.
- Username: Administrator
- Password: (no password)
- Open a Windows explorer and browse to c:\temp\forensicdata\modified and run the file spider.exe (spider solitaire). This is the modified file.
- Does the game of solitaire function as intended?
- Double click the link "MD5Hash" to open a MD5 hashing tool.
- From the Windows explorer drag the file "spider.exe" in folder c:\temp\forensicdata\modified to the MD4Hash window.
- What is the hash value displayed for the modified file?
- Similarly what is the hash value for the original file "spider.exe" in folder c:\temp\forensicdata\original
- Close all windows.
- Open Hex Workshop by double clicking the link "Hex Workshop."
- Click the Compare button on the toolbar (or go to the Tools menu and click Compare > Compare Files)
- Click the button (with ellipses) to the right of the Source box and browse to c:\temp\forensic data\original\spider.exe
- Click the button (with ellipses) to the right of the Target box and browse to c:\temp\forensic data\modified\spider.exe
- Make sure the Resynchronizing Compare radio button option is selected
- Click Ok to begin comparing the two files.
- On the toolbar, click the Next Difference button (next to the Compare button on the toolbar or go to the Tools menu and click Compare > Next Difference)
This will highlight any difference in the file for you. The top window will show the original file and the bottom window shows the modified file. You should see the text that was inserted into this file using a hex editor. This could have been malicious code that was executed when you first opened the file. - Close all windows.
Steganography
The purpose of this lab will be to demonstrate the typical use of steganography. This lab will require the user to use a steganography tool to store and retrieve hidden data from a jpeg file. Steganography is the mechanism to hide relatively small amount of data in other data files that are significantly larger. A simple example of steganography may be the storage of text files in bit-mapped images. Each pixel in a bitmapped image is defined by three bytes representing red, blue and green colors. Each byte is made up of eight bits and represents a shade red, blue or green. Random changes to the least priority bit generally produce only slight changes of shade, typically undistinguishable by the normal human eye as shown by the figure (the arrow shows the changed least significant bit and the resulting color is shown on the side.

kilobyte, the number of bits that may be changed is given by the total number of least significant bits available (one bit from each byte) divided by the number of bits required for one text character (we consider 8 bits). Therefore, 1 kilobyte of image file can accommodate 1024/8 bits = 128 bytes. Hence, a text file of 128 bytes could be hidden in a bit-mapped image of 1 kilobyte.
Exercise
- Login to a Windows machine in the lab.
- Username: Administrator
- Password: (no password)
- Double click the "Steganography" link on the desktop.
- Click on Open Jpeg on the menu bar and open a file in the My Pictures folder in My Documents.
- Create any text file "hello.txt" with some text in the My Pictures folder.
- Click on Hide on the menu bar and give a password "hide" and reenter as required. Then point to the file "hello.txt" that you intend to hide. And lastly, save the image as "hidden.jpg" in the My Pictures folder.
- Close all open files. The message text in "hello.txt" has been hidden in the jpeg image file "hidden.jpg"
- Now to retrieve the hidden message, open the file "hidden.jpg" and give the password as necessary.
- Click on Seek on the menu bar
- Save the file as hidden "retrieved.txt" into the My Pictures folder; replace if necessary.
- Is the message the same in "hello.txt" and "retrieved.txt"?
- What other types files be used to hide text data using stenography?
- What are possibly some useful uses of stenography?
- Close all windows.
Viewing Internet Explorer Cache
The objective of this exercise is to show how the encrypted Internet Explorer cache may be viewed using some freely available tools. Pasco and Galleta are to DOS-based executables that can decrypt the Internet Explorer cache. The use of these tools are demonstrated in this exercise.
Exercise
- Login to a Windows machine in the lab.
- Username: Administrator
- Password: (no password)
- Double click the "Internet Explo…" link on the desktop to open a windows terminal.
- From the parent folder, open the Internet Explorer cache called "index.dat" using a text editor.
- At the prompt, enter: notepad data\index.dat
- What is the content like?
- Close notepad window.
- Use pasco to decrypt the Internet explorer cache called "index.dat"
- At the prompt, enter: pasco\pasco data\index.dat > index.txt
- At the prompt, enter: notepad index.txt
- What is the content like?
- Close notepad window.
- Use galleta to decrypt cookies.
- At the prompt, enter: galleta.exe data\bassel@advertising[2].txt
- What is the result?
- How can Pasco and Galleta be useful?
Installation Instructions
This section will cover the installation if you want to complete this tutorial using your computer.
- Install Hex Workshop (run "hw32v423.exe")
- Download the file "hw32v4423.exe" from the website: http://www.bpsoft.com/downloads/index.html
- Create shortcut to desktop (prompts during install)
- Install MD5Hash (copy folder from CD into c:\forensictools, run setup.exe)
- Download the zip file "hash.zip" and extract files into a temporary directory.
- Run the "setup.exe" file to install the MD5Hash executable.
- Create a shortcut to desktop.
- Create the following directory structure:
- c:\forensictools\PortRedirection
- c:\forensictools\Pasco&Galleta
- c:\forensictools\Pasco&Galleta\data
- c:\temp\forensicdata\original
- c:\temp\forensicdata\modified
- Arrange data for Hex Workshop
- Copy sol.exe (original copy) from the c:\%SystemRoot%\System32\sol.exe into "c:\temp\forensic data\original as spider.exe"
- Download "spider.zip" and extract spider.exe (modified copy) into "c:\temp\forensic data\modified"
- Download the following tools for Port Redirection exercise:
- Quick 'n Easy FTP Server: http://www.pablosoftwaresolutions.com/html/downloads.htm
- FPIPE zipped file: http://www.foundstone.com/resources/freetooldownload.htm?file=fpipe2_1.zip
- FPORT http://www.foundstone.com/resources/freetooldownload.htm?file=fport.zip
- Install tools for Port Redirection exercise in the folder "c:\forensictools\PortRedirection":
- Copy the executable "FTPServer.exe" file to the folder.
- Copy the executables "fpipe.exe" and "fport.exe" to the folder.
- Create shortcuts to desktop.
- Download the following tools for Internet Explorer Cache exercise:
- Download the zip file for "pasco.exe" from http://www.foundstone.com/resources/freetooldownload.htm?file= pasco.zip
- Download the zip file for "galleta.exe" http://www.foundstone.com/resources/freetooldownload.htm?file=galleta.zip
- Install tools and data for Port Redirection exercise to the folder "c:\forensictools\Pasco&Galleta".
- Copy the executable "pasco.exe" file to the folder.
- Copy the executable "galleta.exe" file to the folder.
- Download the file "ieData.zip" from http://www.sis.pitt.edu/lersais/download/IntroSec/lab2/ieData.zip and extract contents into the folder "c:\forensictools\Pasco&Galleta\data"
- Create shortcuts to desktop.
- Install JPEG Hide and Seek tool for steganography.
- Download the Steganography tool as zipped file "jphs_05.zip: http://linux01.gwdg.de/%7Ealatham/stego.html and install it.
- Create shortcut to desktop.
- The environment for this tutorial is ready.