


Access Control and Operating Systems
Lab Overview
The objective of the exercises presented here is to familiarize the students with the access control features available in the Microsoft Windows, UNIX-based and Solaris systems, and to induce the student to analyze the similarities and differences in the access control in different operating systems. This lab is used in Introduction to Computer Security IS2150/TELECOM2810.
Required Equipment/Software
Microsoft Windows
Access control refers to the ability of a user to access a particular object and possibly modify it. In terms of operating systems, access control refers to the ability of a user to read, write or execute a certain file or folder. In this lab, you shall study the access control framework for Microsoft Windows and UNIX-based platforms, by taking Microsoft Windows 2000 and Linux as respective examples.
The Microsoft Windows 2000/XP/2003 series of OSs introduced access control for files, directories and devices. Before you can understand how access control for these operating systems work you much understand how objects are arranged on them. The Active Directory service was introduced in the NT family of operating systems as a means of arranging all users, devices and objects at a centralized location and allowing these networked entities to find each other through this service. Entities are known as objects and they are arranged into a hierarchical structure known as the logical structure by the administrators. A collection of objects that share the same security policies is known as a domain (a container object) and multiple domains can be arranged hierarchically into a tree. A forest is a complete instance of the Active Directory that consists of a set of Figure 1: Active Directory domains that trust each other through a two-way transitive trust. This arrangement of objects into logical structures enables easy management of the objects and allows for more flexible access control. The place Active Directory has in the network is shown in Figure 1.
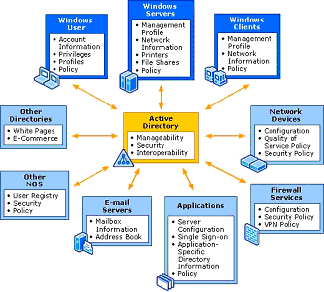
Figure 1
Access Token
Access token. Every entity, which can be users, groups, domains, or processes has a Security Identifier (SID) uniquely associated with it. The SID is very similar to the UID in UNIX. Objects that have some operations associated with them descriptor and to which access must be controlled are called securable objects. Securable objects have security descriptors associated with them that consist of DACLs that describe which users or groups have what access Access request: write Action: denied rights over them, SACLs that describe how auditing is done and the SID of the owner of Figure 2: Example of Access Request the object. Every time an object is created, a security descriptor can be assigned to it, but if it is not assigned, it will inherit it from its parent object. A security context is associated with every process (or user) which describes which groups it belongs to, what privileges it has and what accounts are associated with it. The security context is maintained in an access token. ACLs for an object contain the SID of the intended trustee and an access mask for the various access rights. When access is requested, the access token of the accessing object, is checked with the security descriptor of the accessed object, to see if the access should be permitted or not. An example is given in figure 2.
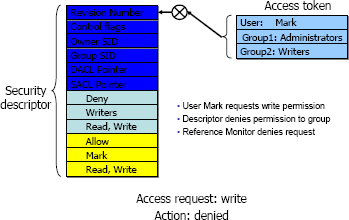
Figure 2
For added security, to protect sensitive data, the Encrypted File System (EFS) was introduced in the NT families. The EFS allows users to encrypt objects created by them so that no other object can access them. The encryption is done using an EFS certificate that the user gets and multiple users can be added to allow access, with the help of their EFS certificates.
Windows Lab Procedures
- Adding Users to the System.
- Go to Start -> Control Panel -> Users and Passwords.
- If a user telcom2810 already exists, remove it.
- Click on Add to add a new user. Enter the username as telcom2810 and password as introtosecurity. Select Restricted User as the group for its group membership.
- Click OK.
- Studying the Effects of Using the Read-Only and Hidden Attributes of a File.
- Create a TXT document in your My Documents folder.
- Right-click on the icon, and select Properties.
- Check the Read-Only checkbox and click on OK.
- Then open the document, add some text and try to save the changes. What happens? Explain why it happens.
- Copy the file and place it in the C:/Documents and Settings/All Users/Documents folder.
- Then logoff and logon as telcom2810.
- Open the C:/Documents and Settings/All Users/Documents folder and try modifying the contents of the file. Are the results the same as in Step 4?
- Repeat Step 2 and uncheck the Read-Only box.
- What happens? Explain why it happens.
- Logoff and log back as Administrator.
- Right-click on the icon and select Properties.
- Check the Hidden checkbox and click on Ok. Do you see the icon now?
- Go to the Tools menu and select Folder Options.
- Under the View tab, check the radio button that says "Show Hidden Files and Folders". Click OK. What do you see?
- Demonstrate the Use of Encryption of Files.
- Log in as Administrator.
- In the C:/Documents and Settings/All Users/Documents, create a TXT document.
- Right-click the document icon and select Properties. Click on the Advanced button next to the Hidden checkbox.
- Check the checkbox that causes encryption of the file's contents and select it only for that file.
- Then log off and log on as telcom2810.
- Go to C:/Documents and Settings/All Users/Documents and try to access the previously created document. What is the result?
- To Explicitly Assign Permissions to Different Users for a Given File.
- Log in as Administrator.
- In the C:/Documents and Settings/All Users/Documents, create a TXT document.
- Right-click the document icon and select Properties. Under the Security tab, click Add and select telecom2810 and click Add.
- What are the default permissions given to this user? Go back and repeat the process, this time adding the group Users. Are the default permissions any different?
- Click the Advanced button and under the Permissions tab, select telcom2810 and click View/Edit.
- Notice the number of permissions that can be added for this user. Also notice the option of explicitly allowing and denying permissions.
- Check the Create Files/Write Data and Create Folders/Append Data checkboxes, under the Allow column.
- Check the Write Attributes checkbox under the Deny column. After clicking Ok once and again at the Advanced window, what do you see? What does that mean?
- Question. Repeat the steps in Exercise 1.4, but create the file in the directory C:/Documents and Settings/All Users/Documents. Then logoff and logon as telcom2810. Is it possible to view the hidden file?
Unix
Unix File Hierarchy
The Unix file system is organized as a hierarchy with the root (/) directory at the highest level. Each directory may contain subdirectories and files. Typically, some of the directories that may occur under the root are usr, bin, sbin, home, var, boot, dev, etc. In Figure 3, user1 and user2 are sub-directories under home. hello.txt is a plain-text file and link_hello is a linking file that points to hello.txt. In order to access the file /test/temp/hello.txt, the system begins its search from the root(/) folder and then to test and temp folders consecutively and then finally the file hello.txt.
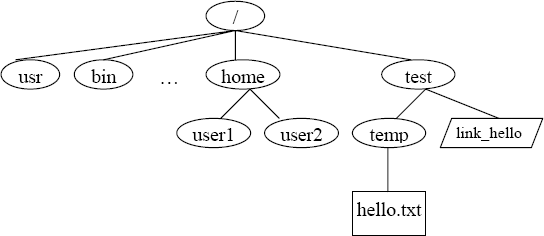
Figure 3
Ownership and Permissions
Ownership of files in UNIX can be viewed in one of three ways: owner (creator), group or others. Using this simple notion of ownership access to files can be controlled by associating unique user ID (UID) and group ID (GID) with twelve permission bits for each file as shown below.
| Extra | Owner | Group | Others | ||||||||
|---|---|---|---|---|---|---|---|---|---|---|---|
| su | sg | t | r | w | x | r | w | x | r | w | x |
Typically these bits are divided into three sets of three bits and three extra bits as shown in table below. r, w and x bits stand for read, write and execute bits for each of the owner, group and others permissions. su, sg and t stand for set_user_id, set_group_id and sticky bits. These 4 sets of bits are often represented in their octal digits. For example, "100 111 101 101" is represented as "4755." When the su bit is set, whosoever executes the file, the UID of the process will be the owner of the file.
Unix Lab Procedures
- Setting up File Structure and User Space. The objective of this exercise is to setup the file hierarchy structure and the users that are required for the exercises in this section. The su command is used to switch users.
- Login as root (password = "enter 2005")
- Use useradd command to create two new users user1 and user2 as follows:
useradd user1 -g users -p user1useradd user2 -g users -p user2
- Check user information with the id command. Note the uid, gid for each output.
id user1id user2id
- Create a directory structure
mkdir /testmkdir /test/temp
- Switch user roles as user1 and then back to root using the su command
whoamisu user1suORsu root(password = "enter 2005")
- Create a new file as root user and change group ownership as well as user ownership of the file.
touch /home/user2/HelloWorldls -l /home/user2/HelloWorld(observe owner and group)chgrp users /home/user2/helloWorldchown user2:users /home/users/HelloWorldls -l /home/user2/HelloWorld(observe owner and group)
- Questions.
- Explain what
chgrpandchowndo? - What do
-gand-poptions mean?
- Explain what
- Differences in File and Folder Permissions. The objective of the following exercises would be to see the differences in file and folder permissions. The chmod command will be used to change file and directory permission to demonstrate the slight differences in permissions for files and directories.
- Observe the result of ls and cd commands
cd /ls -lls -al /home- Switch to user1 using
su user1 ls -al /home/user2(Can you list directory?)cd /home/user2(Can you change directory?)
- Change directory permissions of user2 directory and try again as user1.
- su root
- chmod 740 /home/user2
- Repeat steps 1e to 1g (Can you list or change directory?)
- su root
- chmod 750 /home/user2
- Repeat steps 1e to 1g (Can you list or change directory?)
- touch /home/user2/hello12.txt(Can you create new file?)
- su root
- chmod 770 /home/user2
- su user1
- Repeat step 2g. (Can you create new file?)
- ls -l /home/user2
- Observe the result of ls and cd commands
- Question. What are the directory permissions for user1, user2 and test directories?
- Alternative Syntax for chmod Command. You are expected to learn both the ways to use chmod. The access permissions for the file hello.txt is to set the su bit only, allow all access permissions to owner, read and execute rights to the group and only read rights to others. In other works the 12 bit permission required on the file hello.txt is as follows: "100 111 101 100." This can be achieved in several ways using chmod command:
- chmod 4754 hello.txt
- chmod u+srwx g+rx o+r hello.txt
- chmod u=srwx, g=rx, o=r hello.txt
- New Text Files and Linking Files. Unix supports two kinds of link files--a hard link and a symbolic link. A hard link is a file with the actual address space of some ordinary file's data blocks. A symbolic link is just a reference to another file. It contains the pathname to some other file.
- In the /test/temp/ directory, as root user, create a new text file ("hello") and fill it with some text using touch, pico, vi etc.
- Create a link link_hello in the test folder pointing to hello.txt in the temp folder (refer to file structure in introduction)
- cd /
- ln -s /test/temp/hello /test/link_hello
- Is there any difference in file permissions of link_hello and hello?
- cat /test/link_hello What is the output?
- Default file permissions and Group Access Control. Whenever a new file is created using C program,defulat permissions can be assigned to it. UNIX system allows the user to filter out unwanted permissions by default. This default setting can be set by the user using the umask command. It is a system call that is also recognized by the shell. The command takes the permissions set during file creation and performs a bitwise AND to the bitwise negation of mask value. Some common umask values are 077 (only user has permissions), 022 (only owner can write), 002 (only owner and group members can write), etc.
- In a terminal window, make sure you are a root user. If not the root user, then switch back to root user (use your password to switch).
- Use umask command to check the current mask permission and assign a new mask.
- umask
- What is the current mask? How is it interpreted? (try umask -S or the man pages)
- cd /test
- touch testmask1
- ls al
- What are the permissions of the file testmask1
- umask 0077
- touch testmask2
- Now what are the permissions of the file testmask2
- What is the effect of setting mask value to 0000?
- Setuid Bit, Setgid Bit and Sticky Bit. As explained in the background above, the highest three bits of the permission bits represent the setuid bit, setgid bit and the sticky bit. If the setuid bit is set then the uid will always be set to the owner of the file during execution. If the setuid bit is not set then the uid will be the user who executes the process. Similarly, if the setgid bit is set then the gid will be set to the group that owns the file during execution. If the setgid bit is not set then the gid will be the group that executes the process. The sticky bit is set to keep processes in the main memory. In the following exercise, the objective is to demonstrate how processes are affected when the setuid bit is set. The exercise must be begun with root privileges.
- which touch
- ls -l /bin/touch
- chmod 4755 /bin/touch
- ls -l /bin/touch
- ls -l /home/user2
- chmod 700 /home/user2/HelloWorld
- ls -l /home/user2 (observe timestamp and permissions)
- su user1
- touch /home/user2/HelloWorld
- ls -l /home/user2 (observe timestamp)
- su root
- chmod 0755 /bin/touch
- su user1
- touch /home/user2/HelloWorld
- Question. Why is permission denied?
- Restore the System. After the series of exercises, it is most essential that the system is restored to its normal state so that other students may undertake the exercises again. Below are the series of commands that are expected to restore the system to its original form.
- su root
- umask 0022
- chmod 0755 /bin/touch
- userdel user1
- userdel user2
- rm -rf /home/user1
- rm -rf /home/user2
- rm -rf /test
- rm -rf /home/test/
Solaris
Sun's Solaris operating system is in essence a UNIX-based OS, especially since a large part of early UNIX-based OSs were developed by Sun Systems. The file hierarchy is the same as in UNIX systems, with the exception that user accounts created are given a home directory with the path as /export/home/username. All users are given UIDs when their accounts are created. Also, users can be grouped in different groups to assign similar permissions to each. The new features in Solaris systems include use of user templates, projects and the prominent RBAC access control. We shall discuss these in more detail.
User templates can be created in order to set up a template with certain fixed attributes for users. Then users that have similar properties like students, engineers etc can be created using user templates. Users can be assigned to certain projects which associates them with a certain workload component. This is very useful when it comes to resource allocation.
Role-based Access control was introduced in Solaris systems from Solaris 8 onwards. It was introduced with the intention of administrative purpose, which is why the roles are called administrative roles. The idea although similar to the superuser or root, was developed to overcome the shortcomings of having these accounts. The problem with having superuser or root accounts was that anyone who would be able to hijack these accounts, would be all-powerful in the system. But with the use of RBAC in the Solaris system, the Principle of Least Privilege could be enforced. By this, users could be given some administrative rights, but only to the extent that was required.
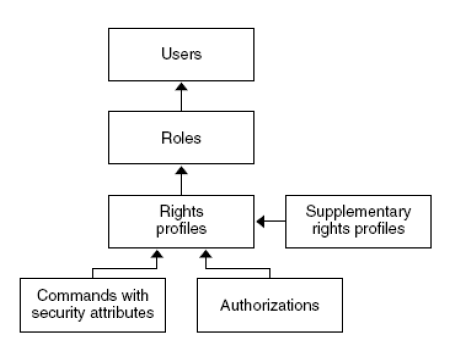
Figure 4: Role-based feature
In the Solaris system, rights are grouped together in to what are called right profiles. These right profiles are then assigned to roles, which users can assume in order to carry out some administrative operations. No roles are created by default, but 3 recommended roles are:
- Primary Administrator – All powerful and similar to the root or superuser
- System Administrator – Administrative privileges without security rights
- Junior Administrator – Administration over some operations like backup, printing etc.
It is to be noted, that roles are totally a function of the organizations needs. The RBAC model introduces some interesting concepts in Solaris. An authorization is a permission to perform a certain class of actions. A privilege is a discrete right that can be assigned to a user, system or object. A security attribute is an attribute that allows a certain process to successfully carry out an operation. Privileged applications can use security attributes to override system controls and perform operations, like setuid and setgid in UNIX systems. A rights profile is a collection of administrative capabilities, and can consist of authorizations, security attributes and even other rights profiles. Finally a role is defined as a special identity for running privileged applications. Roles run privileged applications from a separate shell called profile shell which is a different shell that can recognize security attributes. All of these entities work together as shown in Figure 4.
File Access in Solaris can be controlled through regular UNIX commands as mentioned in the previous section. But a more granular way of controlling access to files is with the help of ACLs. Unlike in UNIX, where all users, groups and others are assigned permissions to a given file, ACLs allow control of access by specific users or groups. This allows finer access control. Access to devices is controlled with the help of device policies and device allocation, which are enforced at the kernel and user allocation time respectfully. In the following lab exercises, some of the tasks are to be performed on the Sun Management Console while the rest are to be performed from command line, through a terminal window. The Sun Management Console (SMC) can be executed at a terminal window as $ /usr/sbin/smc &
Solaris Lab Procedures
- Creating User accounts and Assuming Roles.
- Start the SMC and click on This Computer icon on the left panel.
- Then double click on System Configuration and double click Users.
- Enter the username stadmin and password intro2810 are used to login.
- The next screen asks you to assume the role studentadmin if you wish to continue. You will learn to assign roles in the next exercise. Are there any other roles that you can assume?
- Enter the password as intro2150.
- Then double click on User Accounts. Once the user accounts come up, go to Action on the menu and select Add User->from Wizard.
- Follow the procedure, creating a user with username telcom2810 and password sec2810. Select the group as students.
- Creating Roles and Assigning them to User Accounts.
- Under Users in the SMC, select Administrative Roles and go to Action->Add Role
- Create a role with the name newadmin and password 123abc. Add the Basic Solaris User rights for the role. Add the user telcom2810 as a user who can assume this role
- Logout and login as telcom2810. Then launch SMC. Does it allow you to login?
- Try to create a new user account. What do you see?
- Logout and login as stadmin.
- Working with File Permissions and ACLs.
- Open a terminal and use the following commands to to launch the vi editor, and enter some text into the file. To enter text, hit 'Insert' to go into insert mode and enter text. Then press 'Esc'. Save the file and exit by typing ':wq'.
- $ cd /public
- $ vi testing.txt
- Then logout and login as telcom2810 and open a terminal.
- Enter the command
- $ vi /public/testing.txt
- Enter some text and try to save as before. What do you see?
- Then logout and login as stadmin again and open a terminal.
- Enter the command to set an ACL to allow telcom2810 to write to the file. The command for this is as follows:
- $setfacl -s user:r-x group;r-x other r-x user:telcom2810:rw-
- Repeat steps 2, 3 and 4. What do you see?
- Open a terminal and use the following commands to to launch the vi editor, and enter some text into the file. To enter text, hit 'Insert' to go into insert mode and enter text. Then press 'Esc'. Save the file and exit by typing ':wq'.
- Questions.
- How different is the access control architecture from that of UNIX-based platforms?
- How different is access control management in Windows, compared to UNIX? Which would you say is easier? Which is more efficient?