


Java Code Signing
Tutorial Overview
This tutorial will guide you through the steps required to sign a JAR using Java. To complete this tutorial you must have a basic understating of java and PKI and be able to use the command window. This tutorial is broken down into three sections. The first section is a brief explanation of the java tools used in the entire signing and verification process. The second section covers installing Java and the steps the signer must complete to sign and send a JAR. The final section covers the steps the recipient must complete to verify the signature and access the file. This tutorial is used in IS2771 Security in E-Commerce.
Java 2
Java is an object oriented, platform netural, secure language that was designed to be easier to learn than C++ and harder to misuse. When Sun releases a new version it also makes a free development kit available. You will need a Java2 SDK to complete this tutorial. J2SDK v 1.4.2 was used for this tutorial, which can be downloaded here.
Key Tool
The key tool handles the generation and management of keys and certificates. Java stores keys and certificates in a keystore database, which the key tool accesses to complete its functions. This tool will be used by both parties to create, export, and import certificates.
Jar Signer
The jar signer handles the signing of JAR files and the verification of signatures found on signed JAR files. The jar signer also requires access to the keystore in order to obtain information about certificates stored on the recipients computer in order to verify any signed file.
Policy Tool
The policy tool allows for the creation of security policies, which will grant specific permissions to a certificate, allowing a piece of code to perform dangerous operations. The security policy will reference a particular certificate that is used to verify the dangerous operations it can perform.
Security Manager
The security manager protects assets external to the Java Virtual Machine by keeping track of what code is allowed to perform dangerous operations. When a dangerous call is made to the Java library it will query the security manager to check the access methods for that particular call. If the call is dangerous the security manager will then check a security policy that states what dangerous operations a specific piece of code can perform. A piece of code or certificate can can have multiple security policies. You will use the security manager to verify the validity of the security policy you created, which will allow the test application to run. Without the security policy the security manager will prevent the application from running.
Installing Java and Signing a File
Installing Java
If you do not already have Java 2 installed on your computer you can download it from here. Follow the directions for installing.
Creating a Class File
The source code for the application that you will be signing in this tutorial can be downloaded and is Copy.java. As its name suggests this program will make a copy of itself, which requires the ability to read and write. After downloading Copy.java create a folder called java signing where you will keep all the files required for this tutorial and move Copy.java to it. Open a command prompt and navigate to your java signing folder and issue the command javac Copy.java. You can also now test the program if you wish by issuing the command java Copy.class. You should see the output "file copied" and file called "output.txt" should have been created in the java signing folder.
Create a JAR
The first step to signing any piece of code is to create a JAR file, which will contain the code you wish to sign. You can also sign a text file as long as you created a JAR file containing the text. Now with the class file created create a JAR containing the class file by using the jar cvf Copy.jar Copy.class command.

Create a Key
To generate a key pair you will use the KeyTool. This process will also create your keystore, which is the database that will store keys. The database will be created in the current directory. To generate the keys use keytool -genkey -alias signFiles -keypass kps135 -keystore senderstore -storepass ab987c
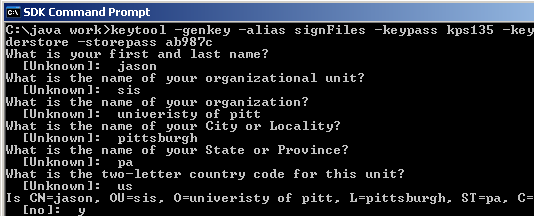
To fully understand the command t a brief explanation is provided.
- genkey is the command for generating the keys
- alias signFiles indicates the alias to be used in the future to refer to the keystore entry containing the keys that you are creating
- keypass kps135 specifies the password that is required to access the keystore entry containing the keys
- keystore senderstore will be your name or initials followed by store to indicate the name of the keystore that will hold the keys
- storepass ab987c specifies the keystore password that is required to access the keystore.
Both the -keypass and -storepass are echoed on screen, which creates a security threat. For this reason these tags should be left off when generating keys and only typed when you are prompted for them.
After using the -genkey flag you will be prompted for the information required to generate the keys. If you do not wish to enter in specific pieces of information it will be filled in with Unknown. After filling out the certificate you will be prompted to confirm the information for your certificate with a y or n.
Sign the JAR
After creating your keys you are now ready to sign the JAR using the private key in the keystore entry aliased by signFiles. To sign the JAR file use jarsigner -keystore senderstore -signedjar signedCopy.jar Copy.jar signFiles
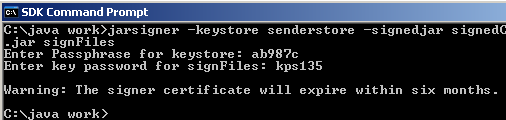
You will be prompted for the keystore password ab987c and the private key password kps135.
Export the Public Key Certificate
To create a public key certificate to send to the recipient use the keytool to export the private key from the keystore that was used to sign the JAR file. Use the following command in the to export the certificate: keytool -export -keystore senderstore -alias signFiles -file sender.cer

You will be prompted for the keystore password which is ab987c.
Viewing a Certificate
Now that you have a certificate, you may choose to view the specific information about it. Use the keytool -printcert -file sender.cer command to view the certificate details.
C:\IS-2731\Lab 2>keytool -printcert -file sender.cer
Owner: CN=Nathan Sulinski, OU=SIS, O=University of Pittsburgh, L=Pittsburgh, ST=PA, C=US
Issuer: CN=Nathan Sulinski, OU=SIS, O=University of Pittsburgh, L=Pittsburgh, ST=PA, C=US
Serial number: 47b8a114
Valid from: Sun Feb 17 16:03:16 EST 2008 until: Sat May 17 17:03:16 EDT 2008
Certificate fingerprints:
MD5: 49:D9:17:98:7C:09:21:50:9E:37:9D:69:FF:DD:C4:FB
SHA1: BF:E0:60:B5:27:C7:C4:02:2D:A5:E8:7B:44:85:6A:B5:E3:E1:63:A8
Importing a Certificate
When you receive certificates from other sources, you will want to import them into your certificate chain (keystore). This becomes a repository of certificates that you trust. Use the keytool -import -alias <cert name> -file sender.cer command to view the certificate details. You may assign any alias that has meaning for the certificate.
C:\IS-2731\Lab 2>keytool -import -alias myCert -file sender.cer
Enter keystore password: ab987c
Owner: CN=Nathan Sulinski, OU=SIS, O=University of Pittsburgh, L=Pittsburgh, ST=PA, C=US
Issuer: CN=Nathan Sulinski, OU=SIS, O=University of Pittsburgh, L=Pittsburgh, ST=PA, C=US
Serial number: 47b8a114
Valid from: Sun Feb 17 16:03:16 EST 2008 until: Sat May 17 17:03:16 EDT 2008
Certificate fingerprints:
MD5: 49:D9:17:98:7C:09:21:50:9E:37:9D:69:FF:DD:C4:FB
SHA1: BF:E0:60:B5:27:C7:C4:02:2D:A5:E8:7B:44:85:6A:B5:E3:E1:63:A8
Trust this certificate? [no]: y
Certificate was added to keystore
Note that the certificate has been added to the keystore. We can verify that by using keytool -list command to view the keystore.
C:\IS-2731\Lab 2>keytool -list
Enter keystore password: ab987c
Keystore type: jks
Keystore provider: SUN
Your keystore contains 1 entry
mycert, Feb 17, 2008, trustedCertEntry,
Certificate fingerprint (MD5): 49:D9:17:98:7C:09:21:50:9E:37:9D:69:FF:DD:C4:FB
Exporting a Certificate
Occassionaly you may wish to send certificates from your keystore to other people. You can use the keytool -export -alias <cert name> -file <filename> command to export a certificate from the keystore.
C:\IS-2731\Lab 2>keytool -export -alias myCert -file NPS.cert
Enter keystore password: ab987c
Certificate stored in file <NPS.cert>
C:\IS-2731\Lab 2>dir
Volume in drive C has no label.
Volume Serial Number is 8C54-5474
Directory of C:\IS-2731\Lab 2
02/17/2008 04:20 PM <DIR> .
02/17/2008 04:20 PM <DIR> ..
10/21/2006 04:56 PM 2,255 Main.class
02/17/2008 04:01 PM 1,698 Main.jar
10/21/2006 11:57 AM 3,210 Main.java
02/17/2008 04:20 PM 812 NPS.cert
02/17/2008 04:07 PM 812 sender.cer
02/17/2008 04:03 PM 1,285 senderstore
02/17/2008 04:06 PM 2,969 signedMain.jar
7 File(s) 13,041 bytes
2 Dir(s) 78,656,049,152 bytes free
C:\IS-2731\Lab 2>
Now the certificate file can be distributed, or stored.